Purpose
To demonstrate how elevators work through a series of pulleys by constructing our own elevator system.
Additional information
Elevators are vertical lift transportation systems that effectively move people between floors of buildings. Most are powered by eclectic motors that pull steel cables along pulleys.
The first known reference to an elevator comes from the Roman architect Vitruvius. He reported that mathematician and inventor Archimedes built the first elevator in 236 B.C. Elevators in this time period were mentioned to have been constructed from hemp rope and powered by hand or animals. Prototypes of elevators were later found in palaces of both England and France.
By the middle of the 1800's, there were dozens of crude elevators that were designed to carry both freight and human. These ancient elevators worked through hydraulic systems, the first every using a plunger below the elevator car to raise or lower it. To assist in lifting the enormous weight of the elevator, a counter-balancing system was implemented.
Sponsored Links
Required materials
- Piece of plywood (or other suitable hard surface wood)
- Six empty spindles
- A cardboard box (we'll use this to create our small elevator)
- String or thread
- Six nails
- A small weight, such as a heavy screw
- Tape
- Scissors
- Ruler
- Pen or Pencil
- Hammer
Estimated Experiment Time
Between 1 and 2 hours
Step-By-Step Procedure
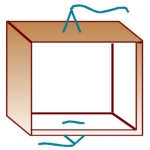
- 1. First we'll need to construct our tiny elevator car from the cardboard box. Using your ruler and pen, draw five six-inch by six-inch squares on your cardboard box. Cut the squares from the box with your scissors. Tape the squares in a manner that will make an open box. Do this by aligning the squares at their edges and joining them together with some tape. Once complete your elevator should look like the example in Figure A.
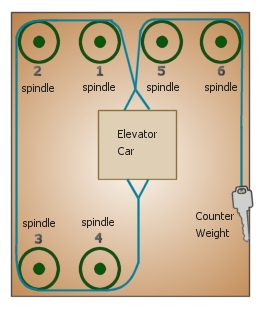
- 2. Attach the spindles to the wooden frame using the nails. The spindles should be aligned so that four are spread evenly at the top of the wood, about four inches apart for each spindle. Two additional spindles should be placed at the bottom of the box, also four inches apart. See Figure B as a placement guideline.
- 3. Tie a piece of string to the bottom of your cardboard elevator car. Tie two additional strings to the top of your elevator car. See Figure A for an example.
- 4. Pass the string attached to the bottom of the elevator car over the spindles 4, 3, 2, and 1. When you get to spindle 2, loop the string over the spindle twice. Tie the end of string to the string on the top of the box once it loops over spindle 1 (see Figure B).
- 5. Attach the other string on the top of the elevator car around spindles 5 and 6. Make sure the string lays over the spindles tightly and attach your counterweight (a large nut, screw, heavy key, or any other weight that's appropriate).
- 6. Make sure all strings are tight and all spindles are firmly in place.
- 7. Turn the second spindle with your fingers (labeled 2 in the Figure B). What happens to the elevator car? If constructed correctly, the elevator car should move up or down, depending on the direction you rotate the spindle.
Note
Positioning the spindles and getting them to stay on your wood piece may be tricky at first, but keep trying! The positioning doesn't have to be perfect. You just want to make sure that the spindles are positioned in a way that the string will be able to sit atop them snugly, while still allowing them to rotate. It may take several tries before you get everything just right.
Figures & Illustrations
| Figure A |
Figure B |
 |
 |
Observation
What happens when you turn the spindle? Does your elevator car move up? Does it move down? How do you think the counterweight affects the movement of the elevator car? What do you think would happen if you added some weight (to mimic people) inside the elevator car?
Result
When you turn spindle 2, the string attached is wound or unwound, resulting in the elevator car moving up or down. The counterweight is used to balance the weight of the elevator car so it's easier to pull up. As the elevator is lifted up, the counterweight moves down.
Sponsored Links
Take a moment to visit our table of Periodic Elements page where you can get an in-depth view of all the elements,
complete with the industry first side-by-side element comparisons!